SOPs
Image Callouts with Nano Banana
When To Reach For It
Section titled “When To Reach For It”You have a screenshot or product photo and you want to draw the eye to a small detail in it — a fine-print line, a tiny UI control, an artist credit, a serial number, a logo. Cropping loses context. Annotating with arrows looks amateur. The right move is a zoomed-in callout that keeps the original image intact and shows the magnified detail in place.
Nano Banana (Gemini’s image model) does this in one shot from a text prompt — no Photoshop, no Figma, no manual masking.
Reach for it when:
- Documenting a UI feature in an SOP and you need to highlight one button on a busy screen.
- Sharing a product photo on social and you want viewers to notice a specific detail.
- Showing the “after” of a fix in a screenshot review where the diff is small.
- Anywhere you would otherwise crop, then explain “look here” in the caption.
Two Styles To Choose From
Section titled “Two Styles To Choose From”This SOP gives you two distinct prompt styles. Both produce a clean zoomed-in detail without cropping the original; they look different and read different.
- Style 1 — Connected Callout (Technical Diagram). A circular or rectangular zoom in a corner, joined to the source area with two thin diverging lines. Reads as diagrammatic. Best for SOPs, technical docs, screenshot reviews.
- Style 2 — Realistic Magnifying Glass. An actual lens hovering over the target area, with curved-glass distortion and a soft drop shadow. Reads as photography. Best for product photos, social posts, anywhere a polished consumer feel beats clarity-of-source.
Pick the one that matches the surface the image will live on, or generate both and choose.
Style 1: Connected Callout (Technical Diagram)
Section titled “Style 1: Connected Callout (Technical Diagram)”Paste your image into Gemini, then send a prompt of this shape:
Keep the original image as the background. Add a {shape} zoomed-in callout in the {position} corner showing the {area} magnified {Nx}. Connect the callout to the source area with two thin diverging lines, like a technical diagram or product photography detail shot.
Slots:
- shape —
circular(default, looks like a magnifying glass) orrectangular(looks more like a technical diagram). - position —
upper right,upper left,lower right,lower left. Pick the corner with the most empty space so the callout does not crowd the subject. - area — what to zoom into, in plain English. “The artist credit area.” “The HP value.” “The serial number bar at the bottom.” Be specific enough that the model can find it.
- Nx — magnification factor.
2xfor a gentle zoom,4xfor a strong product-photography feel,8xfor tiny details. Above 8x the source resolution starts to limit clarity.
The “two thin diverging lines, like a technical diagram or product photography detail shot” tail of the prompt is the load-bearing part — it tells Nano Banana to render the callout as a connected diagram rather than a floating insert.
Style 1 example
Section titled “Style 1 example”Prompt:
Keep the original image as the background. Add a circular zoomed-in callout in the upper right corner showing the artist credit area magnified 4x. Connect the callout to the source area with two thin diverging lines, like a technical diagram or product photography detail shot.
Input: a Pokémon card (Genesect, Paldea Evolved). The artist credit “Illus. Mitsuhiro Arita” sits in tiny print at the bottom edge of the artwork — easy to miss.
Output:
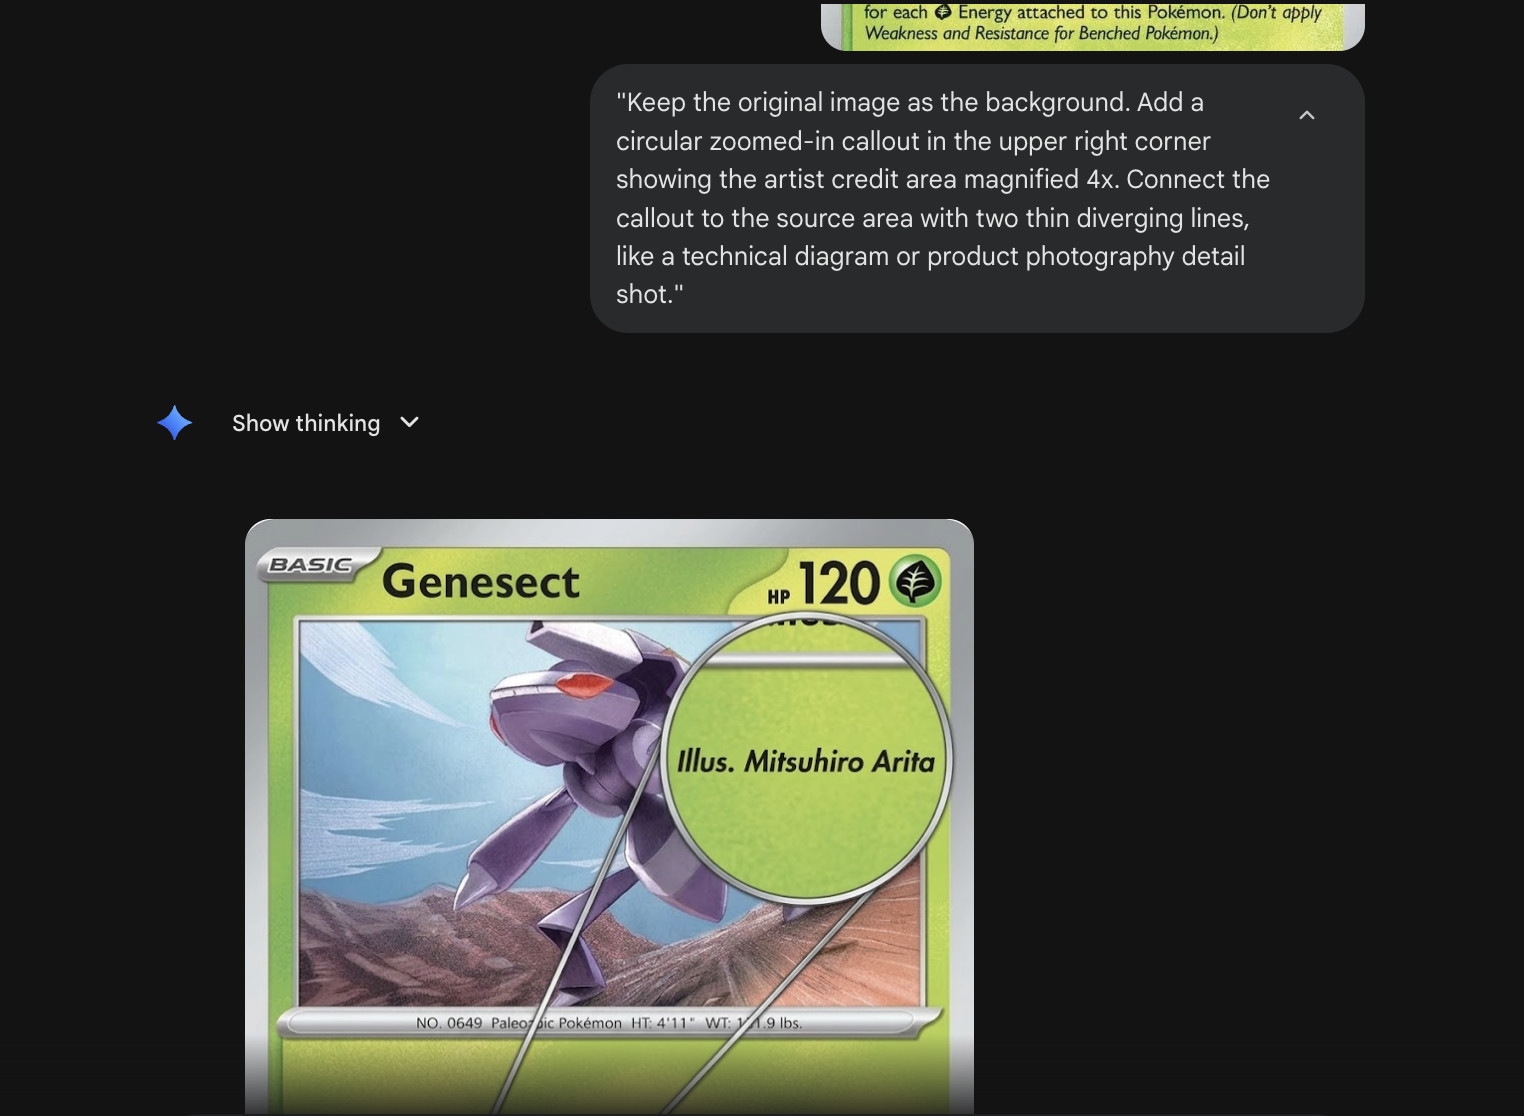
The original card stays intact. A circular zoom in the upper right corner shows “Illus. Mitsuhiro Arita” at 4x. Two thin diverging lines connect the callout to the source area at the bottom of the artwork. No cropping, no caption needed.
Style 2: Realistic Magnifying Glass
Section titled “Style 2: Realistic Magnifying Glass”This style produces a photo-real magnifying glass hovering directly over the target. The lens shows the zoomed detail; the rest of the image stays untouched. No diverging lines — the glass IS the connection.
Paste your image into Gemini, then send a prompt of this shape:
Add a realistic magnifying glass over the {area}. Inside the lens, show that area zoomed in {Nx} with sharp, enhanced detail. The rest of the image stays as-is. Add a subtle lens distortion ring at the edge of the glass and a soft drop shadow underneath.
Slots:
- area — name the target in plain English.
'222/191' text,the HP value,the artist credit. Same idea as Style 1. - Nx — magnification factor.
3xreads natural for a magnifying glass.2xlooks subtle,4xand above starts to feel cartoonish for this style — this is not the right pick if you need to read 8x-tiny print.
The load-bearing phrases in this prompt:
- “realistic magnifying glass” — without
realisticNano Banana sometimes renders a flat circle or an abstract lens icon. - “lens distortion ring at the edge of the glass” — this is what gives the curved-glass look. Drop it and the lens reads as a sticker.
- “soft drop shadow underneath” — separates the glass from the surface so it looks like an object hovering, not pasted-on graphic.
Drop any of these three and the result loses the photo-real feel.
Style 2 example
Section titled “Style 2 example”Prompt:
Add a realistic magnifying glass over the ‘222/191’ text. Inside the lens, show that area zoomed in 3x with sharp, enhanced detail. The rest of the image stays as-is. Add a subtle lens distortion ring at the edge of the glass and a soft drop shadow underneath.
Input: a Pokémon card (Flygon ex). The set number “222/191” sits in tiny print at the bottom of the card — easy to overlook.
Output:
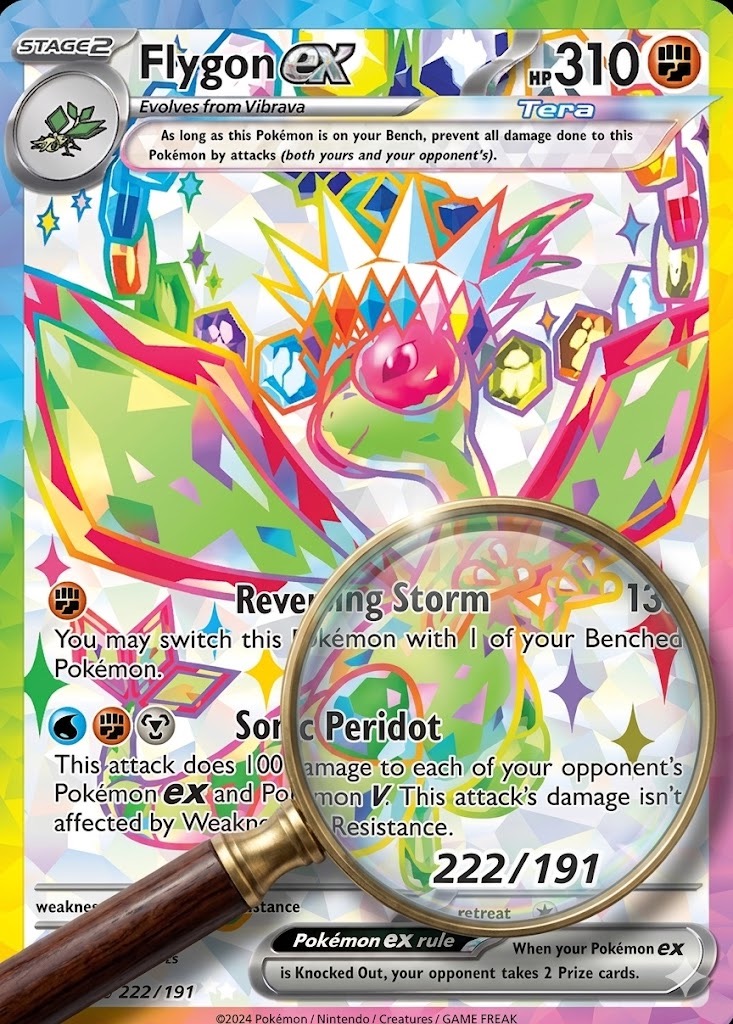
A wood-handled magnifying glass hovers over the “222/191” area, the lens shows the digits zoomed 3x with sharp detail, the rim has a subtle distortion ring, and a soft drop shadow grounds the glass against the card. The rest of the artwork stays untouched.
Variations
Section titled “Variations”- Multiple callouts: “Add two circular zoomed-in callouts: one in the upper right showing X at 4x, one in the lower left showing Y at 4x.” Nano Banana handles two cleanly. Three starts to look busy.
- Annotated callouts: Append
Label the callout "{text}".to add a text label inside or beside the zoom. - Side-by-side instead of corner: “Place the zoomed-in callout to the right of the original image rather than overlapping it.” Useful when the original has no empty corner.
- Rectangular for technical docs: Swap
circularforrectangularwhen the SOP is technical and you want the diagram look rather than the magnifying-glass look.
Why This Pattern Earns Its Spot
Section titled “Why This Pattern Earns Its Spot”Most “add an annotation” prompts produce one of two failures: the model crops the image, or it floats a disconnected zoom box that looks pasted-on. Both styles in this SOP fix that failure with a load-bearing phrase that locks the model into the right shape.
- Style 1 uses “connect with two thin diverging lines, like a technical diagram or product photography detail shot” — that tail is what gets the connected-diagram look every time. Without it, you get random floating inserts.
- Style 2 uses “realistic magnifying glass” plus “lens distortion ring” plus “soft drop shadow” — those three together are what get the photo-real lens look. Drop any one and the lens starts looking like clip art.
These are reusable patterns, not one-off prompts. Save the templates, fill the slots, ship the image.